About event fields
On typical calendars, when you create an event you can also fill in fields like Who, Where, and Description.
With Teamup, you get so much more:
- More control and flexibility with configurable default event fields.
- Special-use event fields like signups and comments.
- Three event fields to upload images and files.
- The ability to create your own custom event fields.
- Visibility control for default and custom event fields.
Default event fields
These are the event fields that come built-in with Teamup:
- Title
- Calendar
- Who
- Where
- Description
- Signup
- Comments
- Attachments
The default event fields can be configured in various ways. More details below.
Custom event fields
Teamup supports four types of custom event fields: single-line text, formatted text, choice, and number. The number of custom fields you can create varies by pricing plan.
- Single-line text fields: Enter a single line of text. These look and feel much like the Who and Where fields.
- Formatted text fields: Enter paragraphs and lists of text with formatting and links. The rich text editor makes this field similar to the Description field.
- Choice fields: Select from a list of prefilled options. These look and feel similar to the Calendar field.
- Number fields: Enter numerical values and get the sum in the Table view.
Important: When you create a custom field, think carefully about which type is best. You cannot change a custom field type once the field has been created. If you made an error, you will need to delete it and start over again.
Text fields
A single-line text field is a simple text-entry form similar to the default Who field. It allows a single line of text input. A link in a single-line text field becomes clickable.
A formatted text field provides a large text area with formatting and linking options, similar to the Description field.
Choice fields
A custom choice field allows users to select from predetermined choice options. A choice field can be single choice or multiple choice:
- A single-choice field allows users to select only one option at a time. Use a single-choice field if it does not make sense for a user to be able to choose multiple options. For example, a Status field might be one of Planning, In progress or Completed, but it would not make sense for it to be both In progress and Completed at the same time.
- A multiple-choice field allows users to select more than one option. Use multiple-choice in scenarios where multiple options may apply at the same time. For example, a booking might have multiple setup specifications, or a film might be multiple genres at once.
Choice field options
The number of options you can add to a custom field depends on your subscription level. See our pricing page for details.
-
- To the right of each option are arrows to rearrange options as needed.
- To the left of each option is a toggle that lets you deactivate it.
- If an option is deactivated, it is hidden and cannot be selected on new events. However, it will still appear on existing events where it was previously selected, unless you check the “Hide” box.
Number fields
A custom number field receives numerical input with specific options related to numerical data:
- Set Pre/Postfix text to display before or after the numeric value.
- Set the number of decimals for rounding.
Number fields are especially useful in the Table view: Each custom number field is shown in its own column in and the sum of the number field (for the selected date range) is shown in the footer row.
Configure event fields
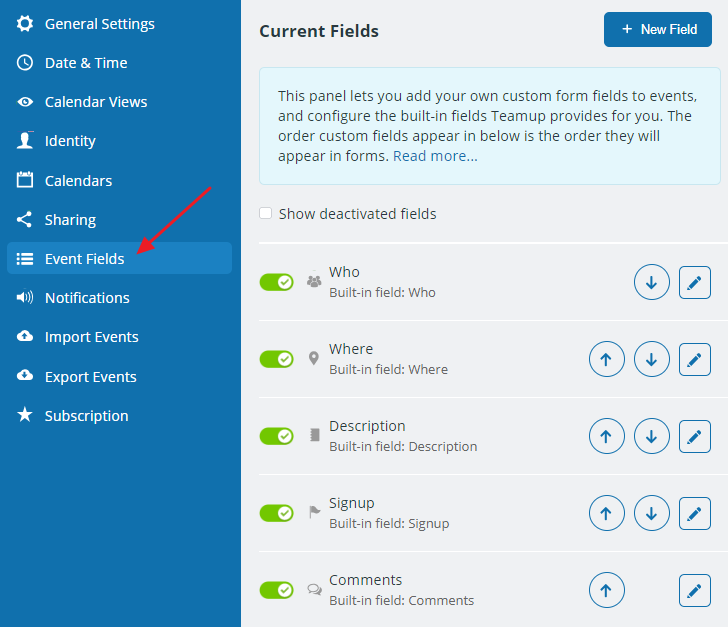
Calendar administrators can configure event fields:
- Open Teamup in a browser.
- Go to Settings > Event Fields.
- This section lists the event fields. If you add custom fields to your calendar, they will also appear in this list.
- To configure an event field, click the pencil icon beside the field name.

- To rearrange event fields, use the arrows to move any field up or down in the order.
- To deactivate an event field, click the toggle next to the field name.
- Note that deactivated fields are hidden from the list by default. To view deactivated fields, check Show deactivated fields at the top of the list.

Configuration options for event fields
See details on how to configure event fields.
Rename the field
If this is left blank, the field will display its default name (e.g. Who).
Make a field required
If this option is chosen, an event cannot be created or edited without that field being completed
Show in event titles
If enabled, the contents of the field will be shown in brackets next to the event title.
Set field visibility
Make the field visible to all users or users with modify permission only.
Defaults and limitations
Some fields have additional defaults to be configured, such as Signups and Comments. There are also limitations on configuration for a few fields.
Deactivate vs delete a field
Deactivated fields do not show on the calendar. They can be reactivated, and their data is not lost.
Deleted fields cannot be restored. They are removed from the calendar permanently and their data is lost.
To deactivate a custom field:
- Go to Settings > Event Fields.
- Find the custom field in the list, and switch the toggle button to red (off), OR
- Click the pencil icon to edit that field. In the Active section, toggle the button to red (off).

To delete a custom field:
- Go to Settings > Event Fields.
- Find the custom field in the list, and click the pencil icon to edit the field.
- Click the Delete button next to the Save and Cancel buttons.
This will permanently delete the field and any information it contains from all your calendar’s events.

Export event field data
Use Teamup’s bulk export feature to export calendar data including contents of default fields and custom fields.