Teamup user accounts are free and provide access to several important calendar features. Here’s how to create and manage your own Teamup user account.
Benefits of a Teamup user account
- Secure account-based calendar access. Calendar administrators can grant calendar access to Teamup users, organize users in groups, and manage calendar access and permission levels.
- One dashboard for easy calendar access. Log in to your account on any browser or the Teamup app on mobile and access all your calendars securely and quickly.
- Teamup has free mobile apps for both iOS and Android devices. With a user account, you can stay synced across all devices and platforms. All you have to do is login to your user account.
- Get event reminders so you don’t forget upcoming events.
- Teamup supports email notifications, daily agenda emails, Slack notifications, and event reminders. With a user account you can set up and manage your own notification subscriptions.
Create a user account
If someone adds you as a user to their Teamup calendar, you’ll get an email invitation. Follow the link in the email to activate your account and access the calendar.

Or, to get started, register here. Fill in a few details and follow the prompts to activate your account.
Log into your account
After you register, follow the link in the activation email to finish setting up your account.
Then you can log into your account on a browser at https://teamup.com/login or on the Teamup app.
When you log in, you’ll see your calendar dashboard where you can quickly access all calendars you’ve created and any that have been shared with you.
Your Teamup user account
Calendar dashboard
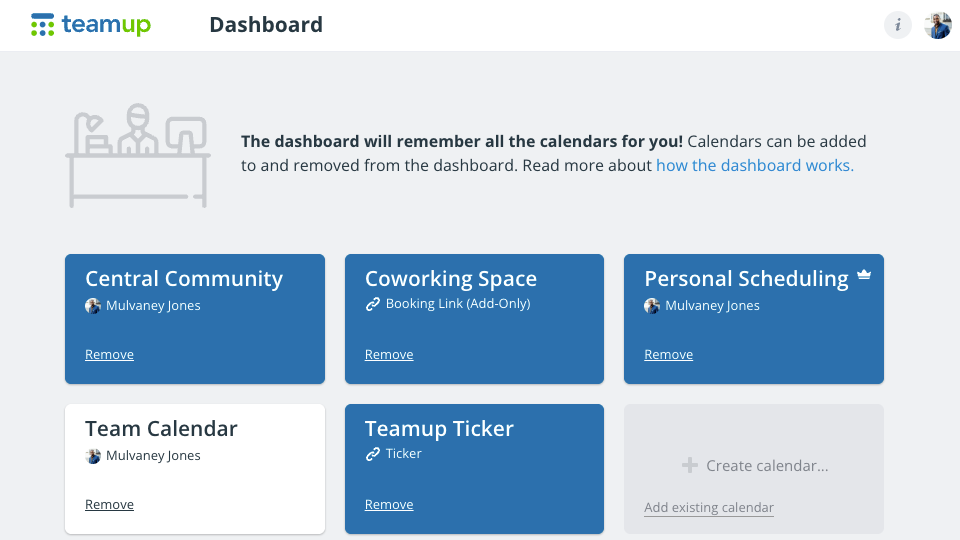
When you log into your account, you’ll see the dashboard. Click a calendar title to open the calendar.
- When you’re added as an account-based user to a calendar, it will automatically appear on your dashboard.
- You can add calendar links to your dashboard manually.
- In a browser, you’ll see a green + button on any Teamup Calendar that has not been added to your dashboard. Click the button to add it to your dashboard for easy access.

User profile
Your user profile is where you can change your avatar and user name, update your email address, change the default language, manage security, or delete your account. Details below.
- Do you have multiple Teamup calendars associated with different email addresses? No problem. You can add additional email addresses to your user account.
Event reminders
When you view or edit an event, you will see the option to enable reminders for that event. In your calendar preferences under the blue calendar menu in the top right, you can select Default Reminders and set reminders for all events on individual sub-calendars.
Syncing
Log into your Teamup user account on the Teamup app (iOS, Android) or any browser. Calendars stay synced automatically across devices.
Manage your user account
Your user profile
The Teamup app will show your avatar, user name, and email. Log into Teamup on a browser to view or update your full user profile. You can access your user profile from the dashboard or from any of your calendars: Click on your account avatar (top right) for the account menu.
- Open Teamup on a browser.
- From your dashboard or from a calendar, click the avatar icon (top right).
- Select Profile.
- The next screen shows your user profile.
- To update your profile picture, click Change Avatar. You can upload your own image or display your initial.
- To change your user name, click into the Name field and type in the name. Click Save.
- To add a secondary email, click Add Secondary Email. Enter the email address and click Add.
- To change your primary email, first add and verify a secondary email. Then set the secondary email as primary. See details here.
- To change the language, select your desired language from the Language menu.
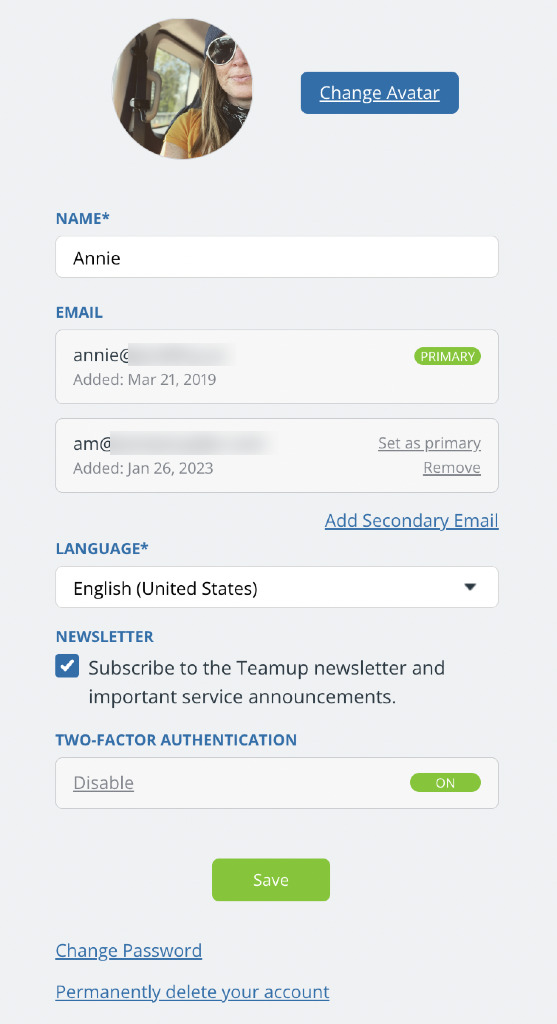
Manage two-factor authentication
- Log into your Teamup account on a browser.
- From your dashboard, click the avatar icon (top right).
- Select Profile.
- Scroll below your user details and click Enable or Disable in the Two-Factor Authentication section.
- Follow the steps as prompted. More details here.
- Click Save.
Change or reset password
- Log into your Teamup account on a browser.
- From your dashboard, click the avatar icon (top right).
- Select Profile.
- Scroll to the bottom of your profile and click Change Password. Follow the prompts.
If you have forgotten your account password, you can reset it:
- Open the Teamup app and click Login OR open the Teamup login page on a browser.
- Click the Forgot your password? link below the login form.
- Enter your email and click Reset Password.
- An email will be sent with a link to reset the password.
Delete your account
Note that deleting your user account will remove your access from any calendars that you’ve been added to as a user.
- Log into your Teamup account on a browser.
- From your dashboard, click the avatar icon (top right).
- Select Profile.
- Scroll to the bottom of your profile.
- Click Permanently delete your account.
- Confirm your choice when prompted.