If you or others on your team are using shareable calendar links to access the calendar, here’s how to switch to account-based access.
Benefits of account access
Account access is the standard way to share a Teamup calendar. Each person in your organization has their own login, permissions, and dashboard. This setup provides security and accountability so people can collaborate and work efficiently.
- Account users can set up event reminders, manage their notifications, and stay synced across devices.
- If someone’s role changes, you can adjust their permissions as needed.
- If someone leaves the organization, you can revoke their access without affecting anyone else.
Shareable links are quick and convenient but less secure than account access. Only use them when account access isn’t practical: To share a read-only view with the public, embed a calendar, or provide temporary access to contractors, for example.
Switch to account-based access
For each person, first add them to the calendar as a user, then delete their calendar link.
Add a user
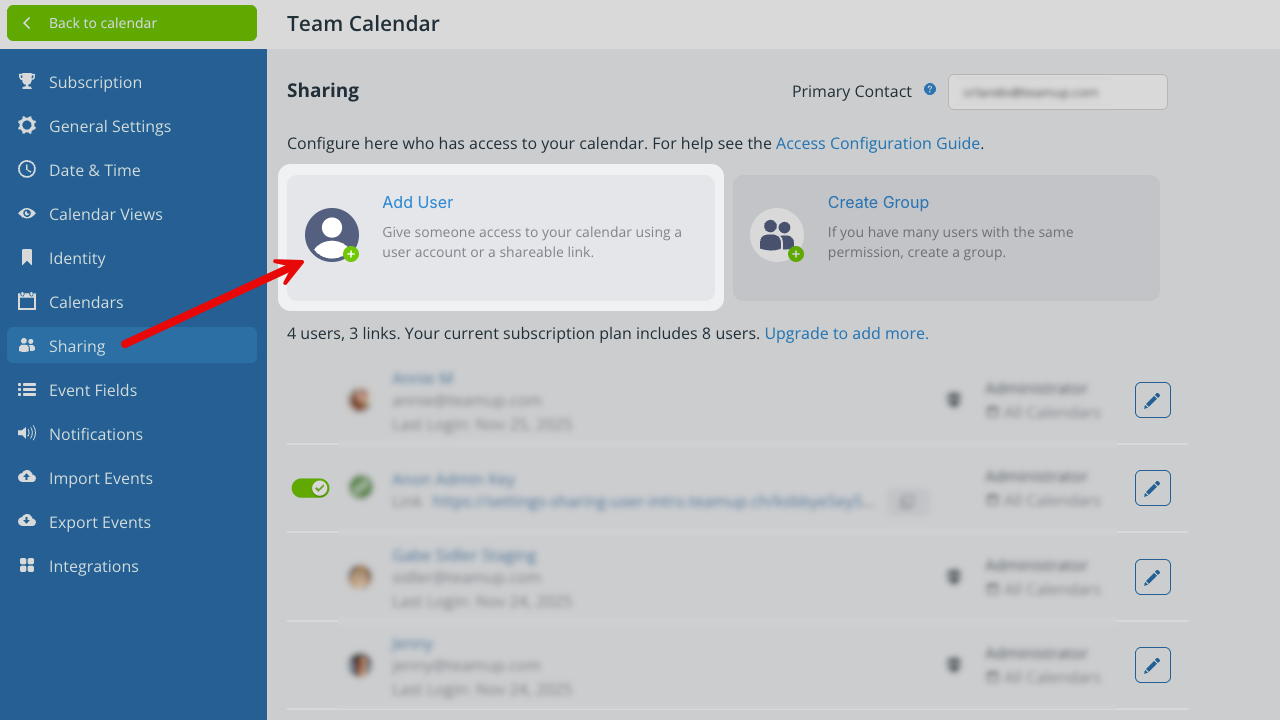
- Open Teamup in a browser and go to Settings > Sharing.
- Click Add User.
- Enter the person’s email address.
- Click Add User.
- Type in the email address of the user.
- Click Add.
- Enter the user’s name if the Name field is blank.
- Scroll to the Calendars Shared section.
- Configure the permissions for this user.
- Save.
The new user will receive an email invitation to activate their account and access the calendar through their user dashboard.
ℹ️ Learn more
Delete the link
Once you have added the person as a user:
- Open Teamup in a browser.
- Go to Settings > Sharing.
- Delete the link they previously used to access the calendar.
Account-based administrator access
If you created a Teamup calendar prior to 2017, you may be using an administrator link. As a calendar administrator, you will have more secure access to your calendar with a user account.
Add yourself as an administrator
- Open Teamup in a browser with your administrator link.
- Go to Settings > Sharing.
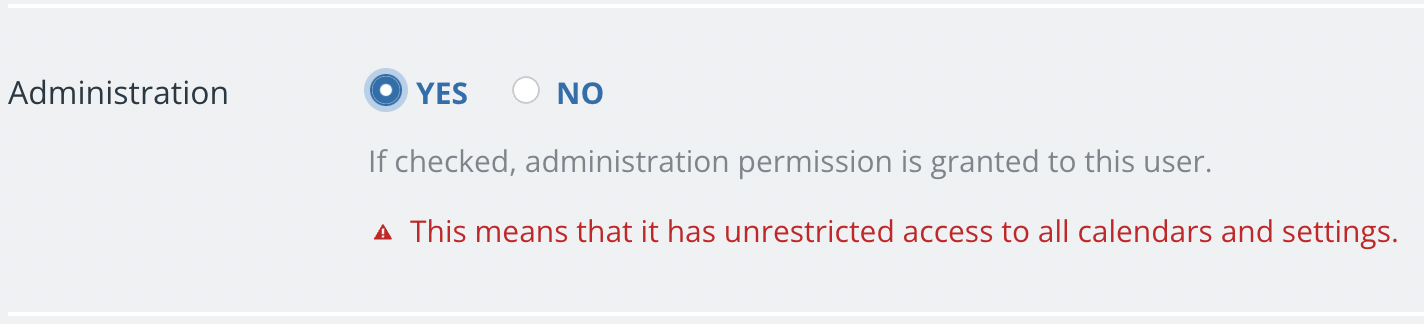
- Click Add User and enter your email address.
- In the Administration section, check the YES box to grant administration permission:

If you already have a Teamup user account, this calendar will now appear on your dashboard automatically. If you don’t have an account yet, you will get an invitation email. Follow the instructions in the email to create your account.
Delete the administrator link
- On a browser, log into your user account and select the calendar from your dashboard. From now on, you can access your calendar this way through a browser or the Teamup app.
- Go to Settings > Sharing.
- Delete the previous administrator link. Deleting it will prevent any unwanted access by others who may have had the link at some point.
- If you still have your calendar open via the administrator link, close that browser tab. Remove the link from your bookmarks. You no longer need it.
🔗 Why it’s important to keep your administrator access secure.
Review and replace links
Aside from the calendar administrator, the same benefits apply to any other users of the calendar, especially for users with a modify permission.
- Open Teamup in a browser.
- Review all calendar links in Settings > Sharing.
- Follow the method above to add account-based users and delete the corresponding calendar links.
- NOTE: Do NOT grant administration privileges to other calendar users. Only the calendar administrator(s) should have admin-level access to the calendar. Users who need to add and manage calendar events can be given modify permission.
When to use calendar links
Shareable calendar links are still an excellent option in certain situations.
For example, read-only links are a secure way to share calendar events with a large group or the public. A read-only link is also good for embedding Teamup. You can use calendar links to provide temporary or limited access to your calendar, as well. Check out how to manage calendar links for details and tips on using calendar links securely.