Both default event fields and custom event fields can be configured in certain ways such as renaming, rearranging, setting visibility, and setting certain defaults.
About event fields
Default event fields come built-in on every Teamup calendar. You can also create custom event fields. Both default and custom event fields have configuration options.
Default event fields
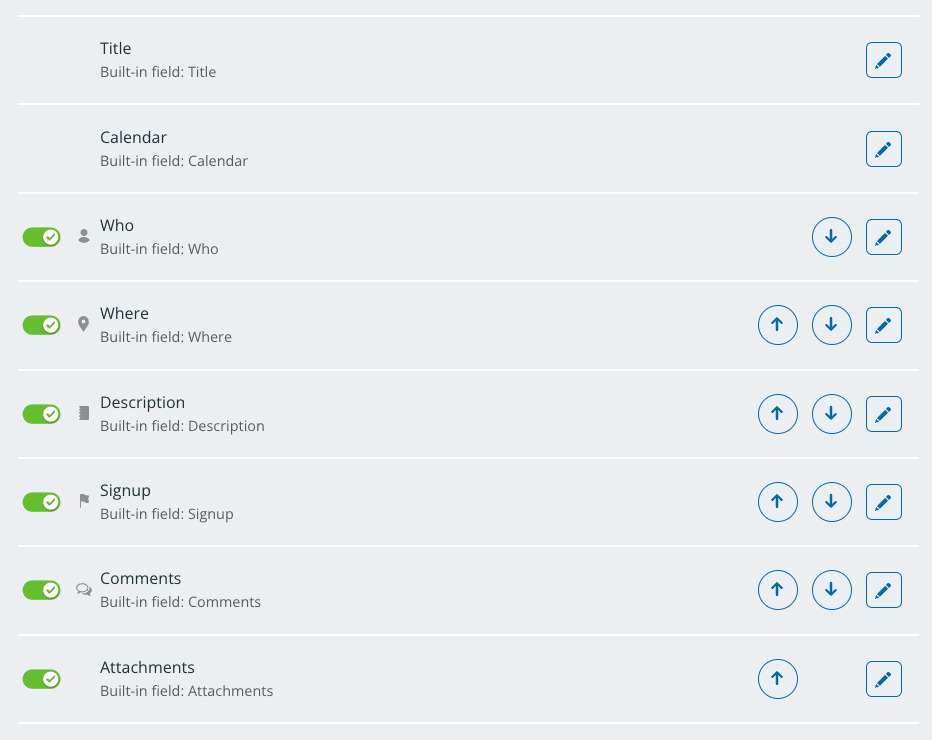
Every Teamup calendar has certain default event fields:
- Title
- Calendar
- Who
- Where
- Description
- Signup
- Comments
- Attachments
Custom event fields
You also have the option to create custom event fields. There are different custom field types:
- text entry field type.
- choice field type with options (single choice or multiple choice).
- numerical data field type.
The number of custom fields you can add depends on your subscription plan. When you add a custom field, it appears in the same list with the built-in fields.
Configuring custom fields
You can configure a custom field when you create it. Custom fields will also be listed on the same screen with the built-in event fields: Settings > Event Fields. Click the pencil icon beside a custom field to open the editor and adjust the configuration as needed.
You can rename, rearrange, deactivate, and make other configuration choices for custom fields just as you can for built-in event fields. In addition, some custom fields have certain configuration options specific to their field type.
Limits on configuring fields
The Title field and Calendar field do not have all configuration options: they cannot be deactivated or rearranged.
The Signup and Comments field cannot be renamed.
How to configure event fields

The calendar administrator can configure built-in event fields and custom event fields:
- Open the calendar in a browser.
- Go to Settings > Event Fields.
- You’ll see a screen with the list of event fields.
- Use the arrows on the right to rearrange fields.
- Use the toggle button to the left of an event field to deactivate (red, X mark) or activate (green, √ mark) it.
- Click the Edit icon next to an event field to edit or configure that field.
Rearrange event fields
- Go to Settings > Event Fields.
- Use the arrows on the right side to move a field up or down in the field order.
The event editor will reflect the changed field order immediately.
Deactivate or activate event fields
- Go to Settings > Event Fields.
- Use the toggle next to any event field to deactivate or activate it. When deactivated, the field will no longer be available on the event editor.
You can also activate or deactivate a field on the Edit Field screen in the Active section.
Rename a field
- Go to Settings > Event Fields.
- Click the pencil icon beside an event field.
- On the next screen, put your cursor in the Name field and type in the name you want.

- Click Save.

Make a field required
- Go to Settings > Event Fields.
- Click the pencil icon beside an event field.
- Check Yes in the Required section. Users will not be able to create or save edits on an event unless the required field is completed.

Show a field in the event title
- Go to Settings > Event Fields.
- Click the pencil icon beside an event field.
- Scroll to the Show in event title section.
- Check Yes to make a field show in the event title: The contents of the field will be shown in the event title, in parentheses.
Set visibility level
- Go to Settings > Event Fields.
- Click the pencil icon beside an event field.
- Scroll to the Visibility section. Select the option you want from the menu, then Save.
The visibility setting applies to the individual field.
- You can have multiple fields of a certain type, e.g. custom choice fields.
- The visibility is set for each field individually.
So it’s possible to have multiple fields of the same type, with different visibility settings for each one.
Visibility levels
There are two visibility levels: All users or Users with modify permission.
- If the visibility control is All users, the event field will be visible to everyone who views the calendar, at any access level.
- If the visibility control is set to Users with modify permission, the event field will only be visible to users with modify-level access.
If a user has modify permission to one sub-calendar and read-only permission to another sub-calendar, the visibility setting will default to the lowest (e.g. read-only) level.
For example:
- A formatted text field is set to be visible only to Users with modify permission.
- An event is created and assigned to both Calendar A and Calendar B.
- User Bob has modify permission to Calendar A and read-only permission to Calendar B.
- When Bob view the event assigned to both Calendar A and Calendar B, he has the read-only permission to the event, therefore he will NOT be able to see the text field. In cases of mixed permission levels, a user’s lowest permission level is used to determine the field’s visibility for that user.
Enable mapping
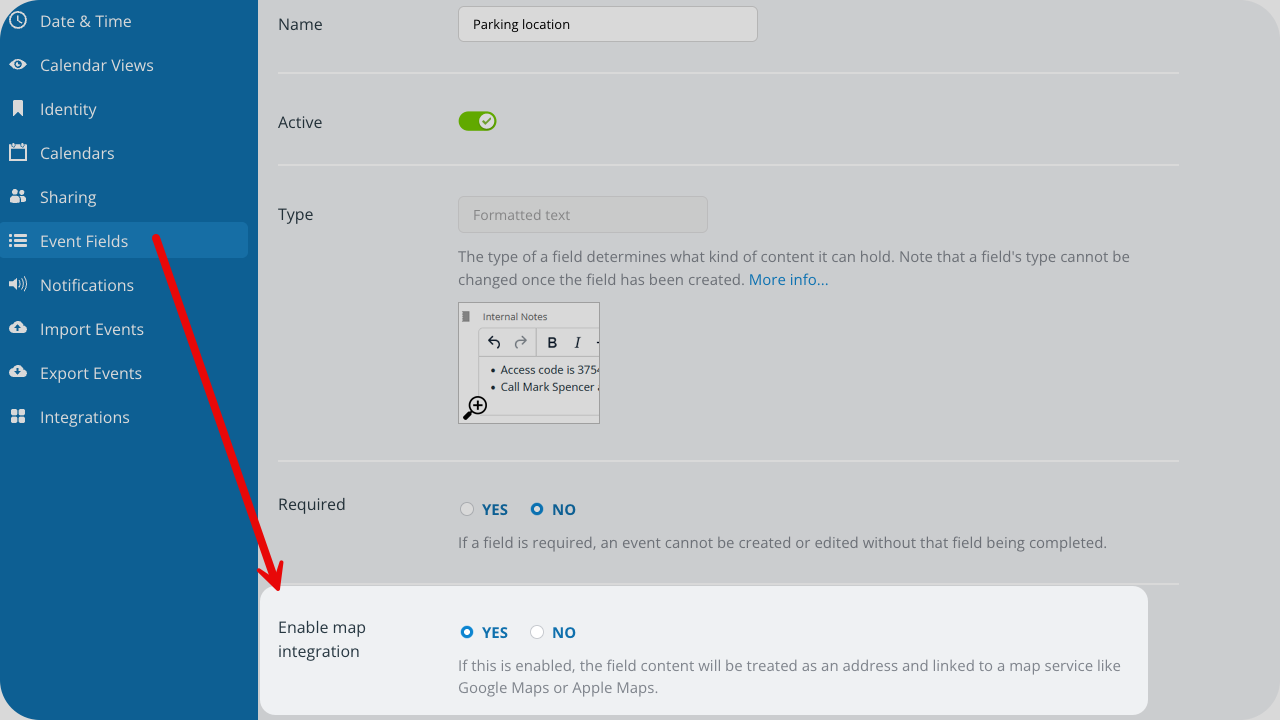
Map integration can be enabled for all single-line text fields and formatted text fields as well as the built-in Where field. When mapping is enabled, the field will automatically pull the map information for the location where your event will take place. There’s a Show on map link allowing users to open the mapped location for directions. Mapping is enabled by default on the Where field.
- Go to Settings > Event Fields.
- Click the pencil icon beside an event field.
- Scroll to the Enable map integration. Check Yes to enable. Check No to disable.
Set defaults for the Signup field

For the Signups field, you can set these defaults:
- Enabled: If checked, signups will be enabled on all newly created events by default.
- Deadline: Toggle on or off; set the default deadline for signups.
- Maximum number: Toggle on or off; set the default maximum number for signups.
- Who can view signups? Choose whether All users or Users with modify permission can see the list of users that signed up.
You can override these default settings on any individual event.
Set defaults for the Comments field

For the Comments field, you can set these defaults:
- Enabled: If checked, comments will be enabled on all newly created events by default.
- Who can view comments? Make comments available to All users or Users with modify permissions by default.
You can override these default settings on any individual event.