The calendar dashboard is your central location for all your Teamup calendars. Your dashboard makes all your calendars securely accessible from any browser or mobile device (via the Teamup app). When you no longer want a particular calendar on your dashboard, you can remove it.
Remove a calendar from your dashboard
Please note removing a calendar from your dashboard only removes your access to the calendar.
- The calendar will continue to exist and be accessible to other users. It is not deleted.
- Any active paid subscription plan associated with that calendar will continue as is. To cancel a subscription plan, follow these steps.
- If you are the only remaining administrative user for a calendar, you will not be able to remove it from your dashboard until you transfer administration to another user.
On a browser
- From your web browser, access your calendar dashboard as usual.
- Hover over the calendar you wish to remove.
- Click on the Remove link when it appears; you’ll be sent to a screen confirming your removal.
- Click the red Remove button to remove the calendar. Click the green Keep Calendar button if you’ve changed your mind or chosen the wrong calendar to remove.
On the Teamup app
- From the Teamup mobile app for iOS or Android, swipe to open the left sidebar.
- Tap the calendar icon to open your calendar dashboard.
- Find the calendar you wish to remove in your dashboard.
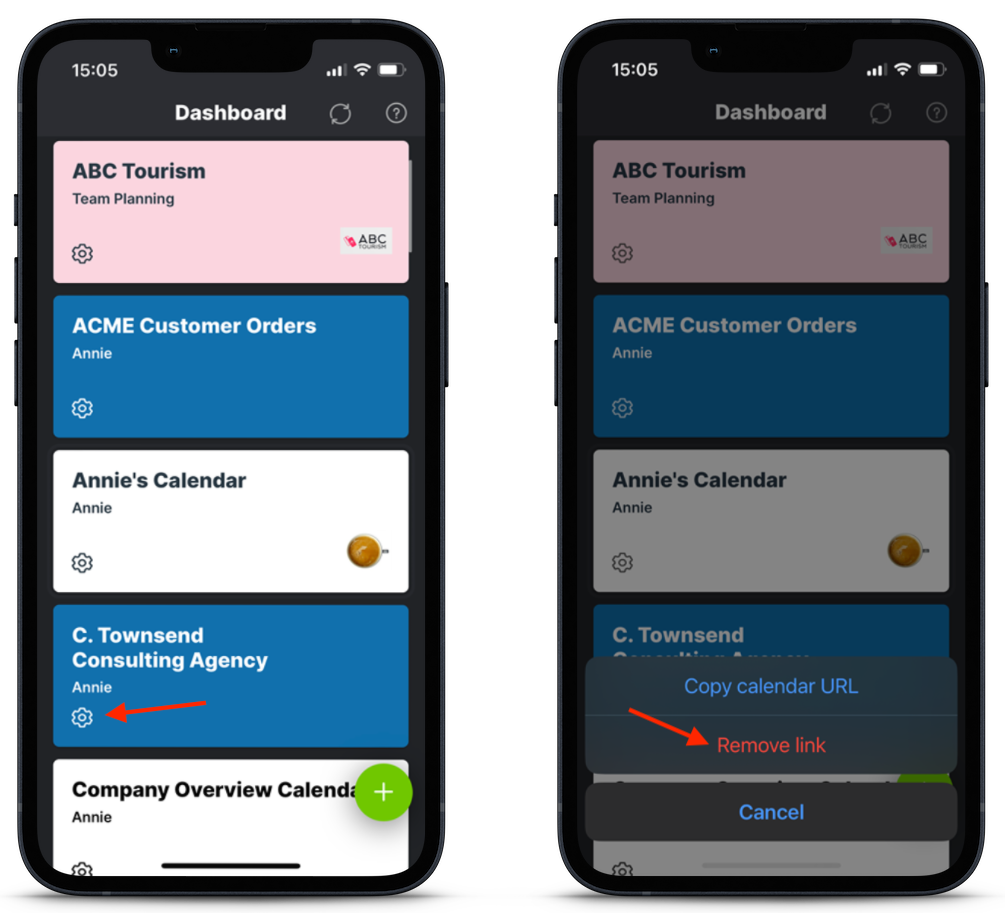
- Tap the Gear icon on the calendar title, then choose the Remove link option.
- A confirmation screen will open. Tap the red Remove calendar button. If you’ve made a mistake or changed your mind, simply hit the Back button.
Unable to remove calendar
If you are the only calendar administrator (i.e. user with administrative permission) for a calendar, you will not be able remove that calendar from your dashboard.
At this point, you have two options:
- Transfer administration to another user, OR
- Delete the entire calendar.
Transfer calendar administration
There are many scenarios when a calendar is still active but you no longer need to access it. For example, you’re no longer active in a group or you’re moving to another job or no longer active in a group. We recommend transferring administration to another user so you will not be the only user with administrative access. Then you can remove the calendar from your dashboard.
- In a browser, open the calendar and go to Settings > Sharing.
- To add a new user as the administrator:
- To make a current user the administrator:
- Find the user in the Sharing list and click the Pencil icon to edit their permissions.
- Check Yes in the Administration section, then click the green Save button.
- At the top of the Sharing screen, update the primary contact.
- In Settings > Subscription, update the billing email and payment information (if on a paid plan) as needed.
Delete the entire calendar
If the calendar is no longer in use and you wish to delete it, you can do so from the calendar settings (not from your account dashboard). It will automatically be removed from your dashboard when deleted.
Caution: If you delete a master calendar, you will delete all the sub-calendars, events, and data it contains. Delete with caution!
- Go to Settings > General Settings.
- Scroll to the bottom to find the Delete Calendar section:

- Click Delete.
- A dialog window will open with a warning. This is to prevent accidental calendar deletions. Click on Delete Calendar Forever.


