When roles change and you need to install a new calendar administrator, here’s what to do.
What is administrator access?
Administrator access is significantly different than all other access levels, because it gives full access to all calendar settings.
Calendar administrators have full power over the master calendar and all sub-calendars: they can see and modify all events, make any changes to events or sub-calendars, and can add, remove, or delete users, groups, or shareable links. With administrator access, they can even delete the entire calendar.
To maintain a secure calendar:
- Only assign administrator access to an authorized individual who understands how to use the calendar settings.
- Limit the number of administrators; fewer (one or two) is best to maintain security.
- Do not provide administrator access to people who need to work with the calendar events, but not the calendar settings. For these individuals, provide modify permission. Details below.
Administrator v modifier
For users who need control over calendar events, the modify permission is adequate.
- Modifier: A modifier (a user with modify permission to all sub-calendars) can interact with, create, edit, and delete calendar events.
- Administrator: An administrator has the same abilities as a modifier, plus the ability to access the full calendar settings and manage sub-calendars, event fields, users, and configuration.
If you’re not sure whether a user needs to be a modifier or an administrator, start with the modifier role.
Change the calendar administrator
Roles change in organizations. The calendar administrator will likely change over time, being passed on from one person to another. It may be helpful to have one supervisor in the organization who retains administrator access to the calendar to manage this role change when needed.
To change the calendar administrator:
- Set up the new administrator.
- Revoke admin privileges for the existing administrator.
- Review all calendar access and notifications.
- Review billing details.
Set up the new administrator
A current administrator or supervisor with administrator access should complete this step:
- Open Teamup in a browser.
- Go to Settings > Sharing.
- Add or edit the user:
- Add the user who will be the new calendar administrator, OR
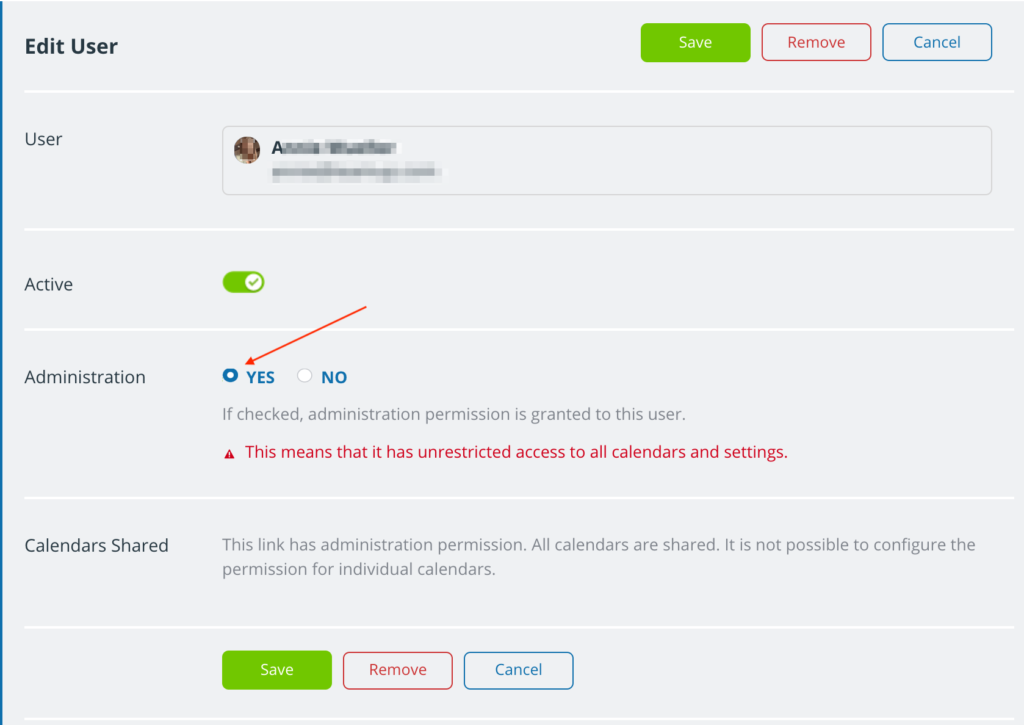
- If the individual is already a calendar user, locate them in the list of users. Click the pencil icon by the user’s name.
- In the Administration section, check YES to grant administrator access:
Revoke admin access for exiting individual
- Open Teamup in a browser.
- Go to Settings > Sharing.
- Find the exiting administrator in the list of users:
- Remove the exiting administrator as a calendar user (completely) or
- Revoke administrator access and set new access permissions for the exiting administrator as needed.
Review calendar access and notifications
It’s a good idea at this point to review all existing access to the calendar (users and links) as well as active notification subscriptions, and deactivate or delete any that are outdated.
⚠️ Note: Security update
If your calendar was created prior to September 2020, there may be active links with administrator access. For better calendar security, it is no longer possible to create new admin-level links.
To keep your calendar secure:
- Switch to user account-based administrator access only.
- Delete or deactivate the link(s) with administrator access.
ℹ️ Learn more.
Calendar access
- Open Teamup in a browser.
- Go to Settings > Sharing.
- Review all active users, groups, and links.
- Ensure that users and groups have appropriate permissions.
- Remove users who should no longer have calendar access.
- Delete links that are no longer needed.
Note: Take special care with those which have Modify permission, ensuring that these links or users are valid and up-to-date.
ℹ️ Learn more.
Notifications
- Open Teamup in a browser.
- Go to Settings > Notifications.
- Review all active notification subscriptions and deactivate or delete any that are no longer authorized or needed.
ℹ️ Learn more.
Review billing details
Check the billing details to ensure the contact information and payment method are up-to-date.
- Open Teamup in a browser.
- Go to Settings > Subscription.
- Click the blue Billing Details button.
- Enter your new billing details and Save.
ℹ️ Learn more.
Get help with an administrator change
If you have lost administrator access completely or need help completing an administrator change, please contact support@teamup.com with the following information:
- Any calendar link(s) you have
- The title of the calendar
- The email of the previous administrator
- The email for the new administrator
- An email from a superior vouching for the new administrator as being authorized, preferably from an email address with your company domain name.