Email notifications are a type of change notification. They are sent when changes occur on your calendar. They are not event reminders or daily agenda emails.
What are email notifications?
Email notifications are a type of change notification. Change notifications are triggered when something changes on your calendar; for example, when an event is added, the time or date of an event is changed, a comment is made on an event, someone signs up for an event, or an event is removed. Change notifications can be sent via email (discussed here) or as push notifications.
Any calendar user can receive change notifications. Only account users can manage their own notifications. See more details here.
Change notification types
When you set up push notifications for calendar changes, you can choose from four options to determine when notifications are triggered.
- All changes: A notification will be triggered by new events, deleted events, and any changes to an event including event comments and event signups.
- New events: A notification will be triggered when an event is created.
- Important changes: A notification will be trigged by new events, deleted events, and date and time changes.
- Comments: A comment on the event will trigger a notification.
- None: Notifications will not be triggered.
One notification type can be applied to all sub-calendars, so notifications are triggered in the same way for changes on any of the calendars.
Or the notification type can be set for each sub-calendar individually; this allows you to receive notifications from some calendars but not others, or to have notifications triggered for different changes. For example, you could receive notifications for all changes on Calendar A, only for important changes on Calendar B, and no notifications for Calendar C.
Set up email notifications
In a browser

- Ensure that you are logged into your Teamup user account.
- Open your calendar.
- From the blue menu (top right), select Preferences > Change Notifications.
- On the next screen, click to select Email Notifications.
- In the Active section, if the toggle displays X/red, toggle it to √/green.
- In the When section, select the timing for email notifications: Immediately or Daily Summary.

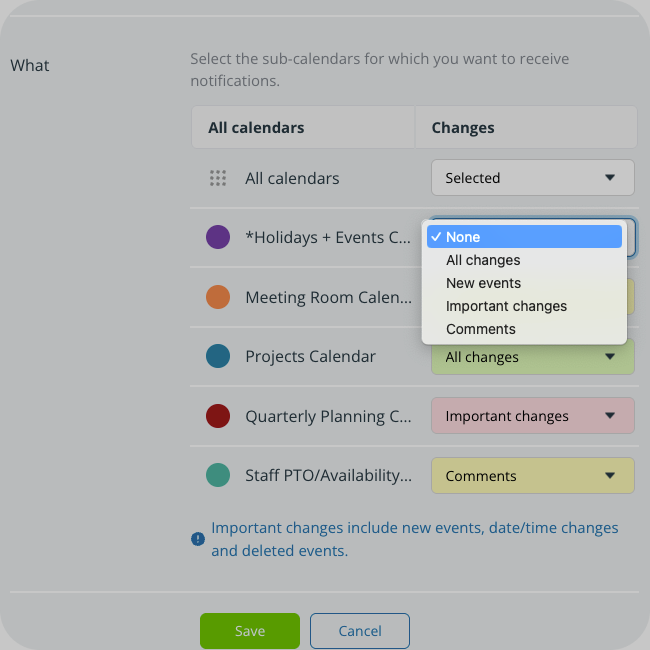
- In the What section, use the menu beside All sub-calendars to set one notification type for all calendars. Use the menu beside a sub-calendar name to set the notification type individually for the selected calendar.
- Set the notification type: All changes, New events, Important changes, or None.
- None: No notifications.
- All changes: New events, deleted events, and any changes to an event including event comments and event signups.
- New events: A new event is created.
- Important changes: New events, deleted events, date and time changes.
- Comments: Event comments only.
- Once your preferences are set, click Save.

In the Teamup app

- Swipe to open the left sidebar.
- Tap the gear icon to open app settings.
- Tap Change notifications.
- Tap Email notifications.
- Tap the toggle to make email notifications active.
- Tap When and select Immediately or Daily.
- Set the notification type for all sub-calendars or individually for selected sub-calendars:
- Tap beside All sub-calendars to set one notification type for all calendars.
- Tap beside a sub-calendar name to set the notification type individually for the selected calendar.
- Tap the desired notification type from the pop-up menu.
- Tap the check mark (top right).
Manage email notifications
You can adjust your notification preferences or unsubscribe from email change notifications via the Teamup app or a browser.
In a browser
- Ensure that you are logged into your Teamup user account.
- Open your calendar.
- From the blue menu (top right), select Preferences > Change Notifications.
- Click the Pencil icon next to Email Notifications.
- Change any preferences, then click Save.
- To unsubscribe: Change the toggle to red/X to deactivate email notifications.
- Click Save.
Alternately, follow the link at the bottom of any notification email to adjust your preferences or unsubscribe.
On the Teamup app

- Swipe to open the left sidebar.
- Tap the gear icon to open app settings.
- Tap Change notifications.
- Tap Email notifications.
- Change any preferences, then tap the check mark (top right).
- Or, to unsubscribe: Tap the Active toggle to off/white.
- Tap the check mark.
See all active change notifications
On a browser, you can view all active notification subscriptions for your user account.
- Log into your Teamup user account.
- Click your profile image/avatar in the top right to open the user menu, then click Notifications.
- You will see a list of all active notification subscriptions for your user account. Each active notification will have options to Unsubscribe or to Change your preferences.
Notification emails

The notification email contains a summary of the change(s) to the calendar, as well as a link to the event(s).
- The first line indicates the email address that was used to subscribe to the notifications.
- Events are grouped by the type of changes made.
- There is a link to the actual event that has been changed or newly added.
- The calendar to which the event belongs to is also listed and is clickable.
- There is a link to manage notifications at the bottom.
- For security reasons, DO NOT forward any of your notification emails to others who may not be authorized to access your calendar. To share a calendar event with someone who does not have access to the calendar, use one of the Sharing options on the event itself. See more about sharing a calendar events.