Teamup’s subscription plans are calendar-based: Each subscription plan is bound to a specific master calendar. Subscriptions can be managed within the respective calendar’s settings by the calendar administrator.
Subscription plans
A subscription is associated with a calendar, not with a user account. Each master calendar has its own subscription. See our pricing page for details about subscription levels:
- Basic (free)
- Plus
- Pro
- Business
- Enterprise
Subscription plan differences
Each subscription level includes a different amount of sub-calendars, custom fields, users, file storage, historical data, and access to certain features. See our comparison chart for a full breakdown of each subscription level.
- Pro and higher: Account users beyond the allowed subscription limit can be added at an additional charge.
- Business and Enterprise: Additional sub-calendars can be added at an additional charge.
- Contact our support team to add more users or sub-calendars to a qualifying subscription.
Free service
When you create a new Teamup calendar, you can choose the Basic (free) plan or you can choose a free trial of one of our paid subscriptions.
Teamup can be used as a free service as long as you like on the Basic plan.
Free trial
You can choose a free trial of a paid subscription plan when you create a Teamup calendar. The free trial will last for three days. During the trial period, you can access and use all the functions included in the paid subscription level.
- If you do not enter billing details during the trial period, your calendar will automatically revert to a Basic plan when the trial ends.
- Enter billing details at any time to activate the subscription. Make sure the highlighted plan is the one you want.
Change or cancel a subscription
To upgrade, downgrade, renew, or cancel your subscription:
- Open the calendar in a browser.
- Go to the blue menu (top right).
- Select Settings.
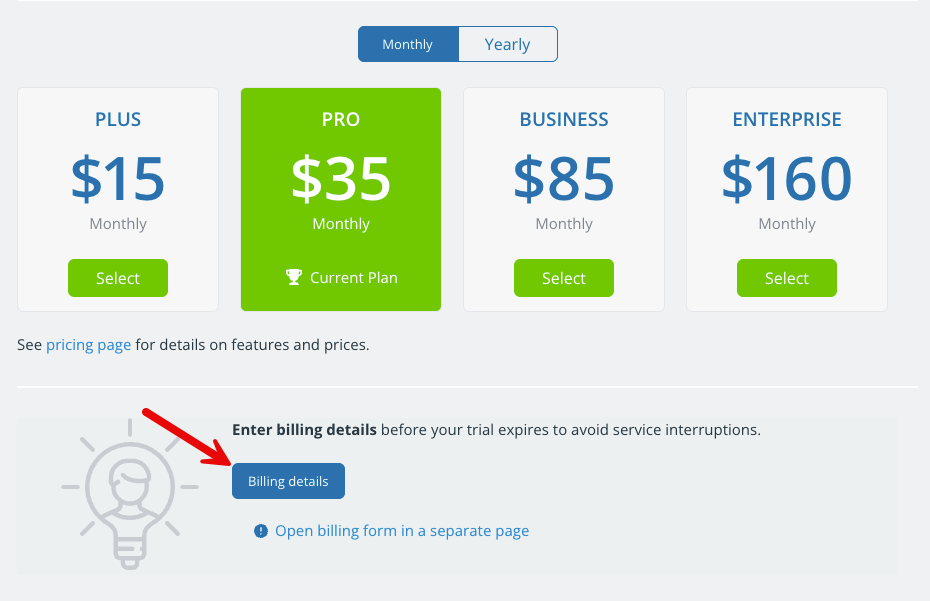
- Select Subscription. You will see information about the current subscription plan and options to change your plan or billing cycle. Details below.
Upgrade
- Open the calendar in a browser.
- Go to the blue menu (top right).
- Select Settings.
- Select Subscription.
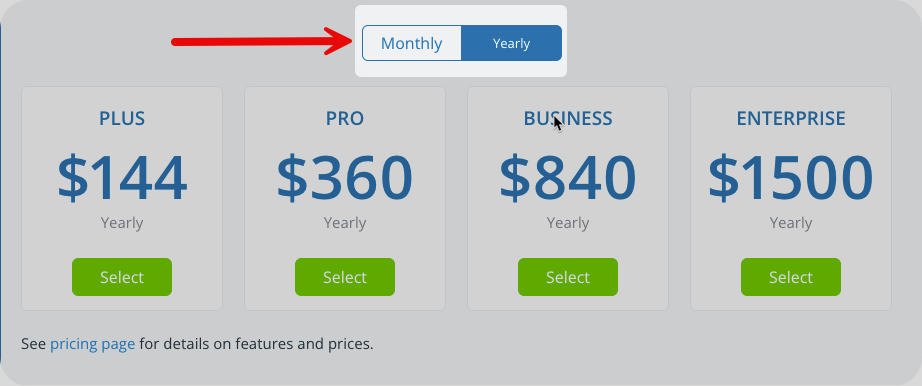
- Click the Monthly or Yearly tab to select your billing cycle. The plan pricing will change to reflect the Monthly or Yearly charge for each plan.
- Click the green Select button for the plan you want.
- If upgrading from a Basic (free) plan, click the blue Billing details button and enter your payment information, then Save.
If upgrading from a paid plan, you will be charged for the difference in price and the upgrade will be applied to your calendar immediately.
Downgrade
To downgrade to the Basic (free) plan, see how to cancel your subscription.
- Open the calendar in a browser.
- Go to the blue menu (top right).
- Select Settings.
- Select Subscription.
- Click the Monthly or Yearly tab to select your billing cycle.
- Click the green Select button for the plan you want.
Important notes:
- The downgrade will apply at the end of your current billing cycle. You will have access to your original subscription level until then.
- At the end of the billing cycle (yearly or monthly), the downgrade will apply and the billing will automatically adjust to the downgraded cost.
- When you downgrade your subscription, any sub-calendars, users, or custom fields beyond the new plan’s limit will be deactivated. Deactivated sub-calendars and custom fields are not deleted and can be reactivated if you upgrade in the future.
Cancel
- Open the calendar in a browser.
- Go to the blue menu (top right).
- Select Settings.
- Select Subscription.
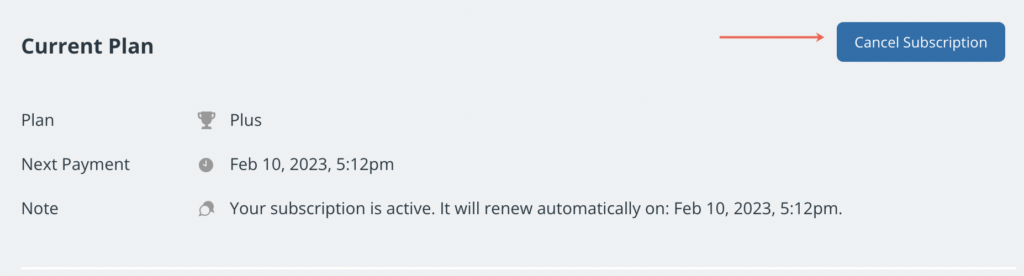
- Click Cancel Subscription in the top right of the screen:

- On the next screen, click Cancel Subscription :
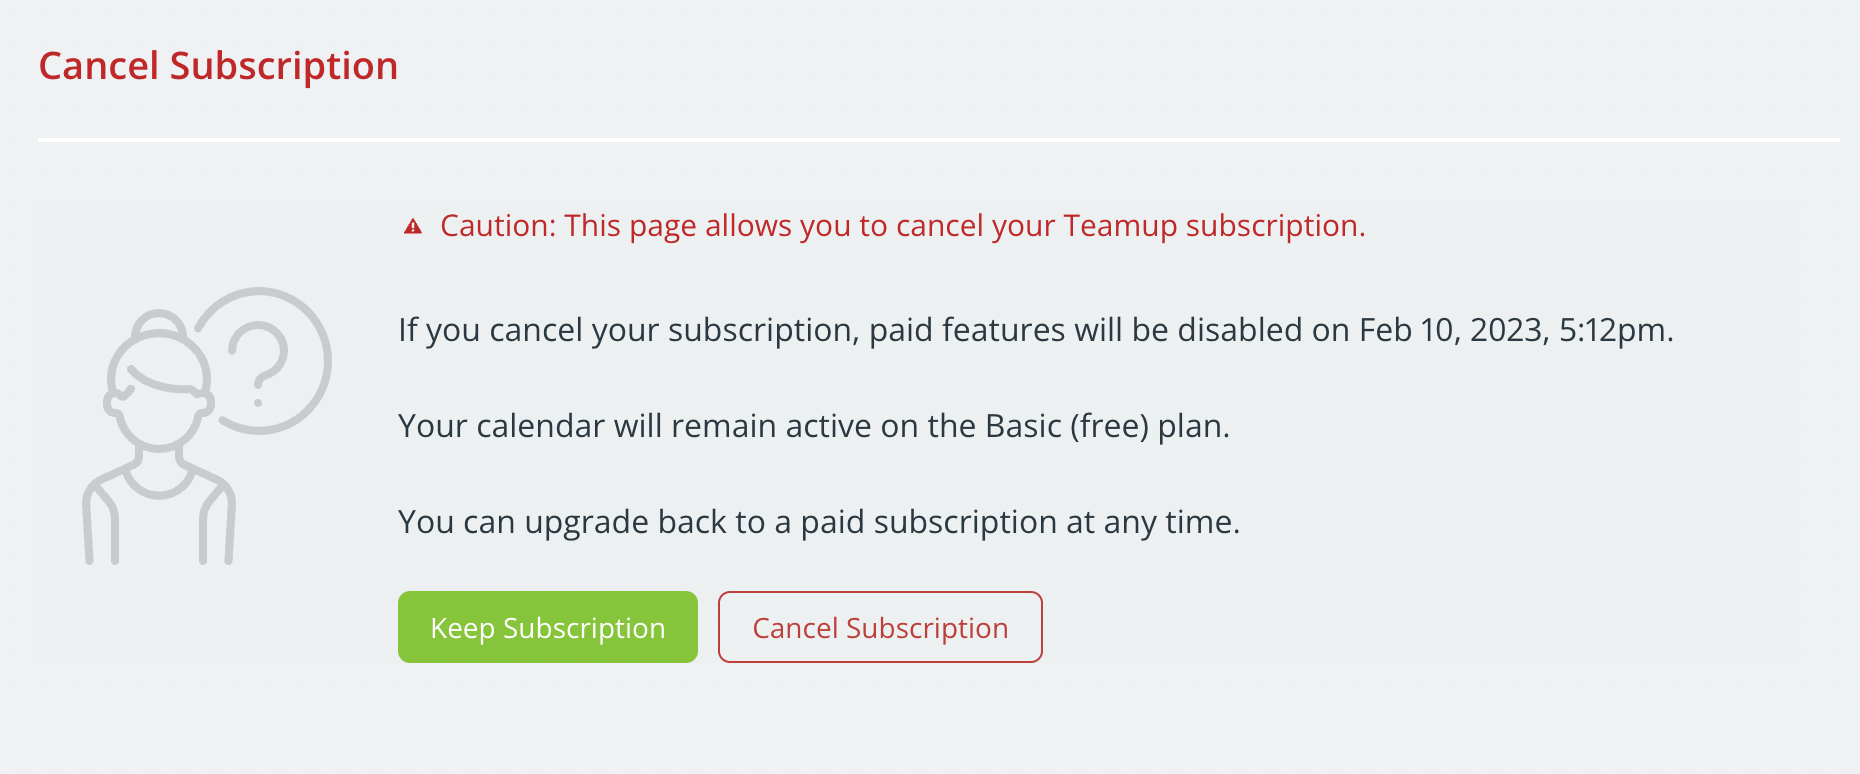
Important notes:
- You will have access to your current subscription level until the end of the billing period.
- At the end of the billing period, any sub-calendars or features beyond those allowed on the Basic (free) plan will be deactivated.
- If you renew or upgrade your subscription, your deactivated sub-calendars will be available again.
- Canceling a calendar subscription does not delete the calendar.
- Canceling a calendar subscription does not delete a Teamup user account.
Monthly and yearly billing
You can pay for your Teamup subscription on a monthly or yearly basis. All Teamup paid subscriptions are billed automatically.
Renewal
Since billing occurs automatically, there is no need to manually renew your plan.
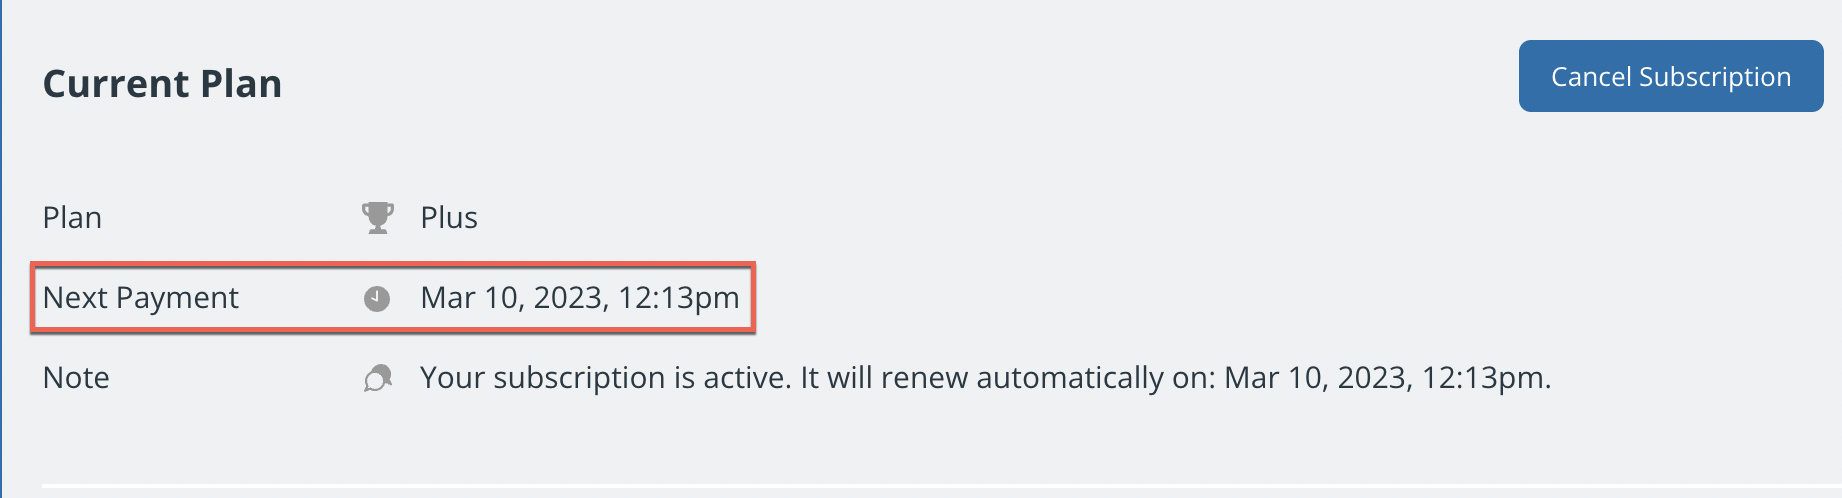
The date of your next renewal is noted in Settings > Subscription:
- If you pay on a monthly basis, then each month you will be automatically charged for your continuing subscription.
- If you pay on a yearly basis, then you will be automatically charged annually for your continuing subscription.
At the end of your current billing period, your plan will automatically renew and you will be charged for the next subscription period.
Change billing cycle
To switch from yearly to monthly billing, or vice versa:
- Open the calendar in a browser.
- Go to the blue menu (top right).
- Select Settings.
- Select Subscription.
- Check the Monthly and Yearly tabs. The cycle you are currently on will be blue.
- Select the other tab to switch to that cycle. The plan pricing will change to reflect the Monthly or Yearly charge for each plan.
Important notes:
- If you have paid for a yearly subscription and switch to monthly billing, the remaining credit of your paid amount is applied to the monthly billing charges until it is used up. Any further amount due is charged to your credit card on file.
- If you have paid for a monthly subscription, and change to yearly billing, any remaining monthly credit is applied to the yearly fee and you pay the difference only.
- You can downgrade or upgrade your subscription at any time. Your subscription will be renewed automatically according to your chosen plan. To cancel your subscription, click the button in the top right. The cancellation will take effect at the end of the current billing period. No refund will be provided.
Payment details and billing history
Payment information and billing history is always available in the calendar settings. You can update the email address for the billing contact, update the billing address, update your payment method, and view or download invoices.
Add payment details and method
To choose a paid subscription plan, provide payment details and choose a payment method.
- Open the calendar in a browser.
- Go to the blue menu (top right).
- Select Settings.
- Select Subscription.
- Click the blue Billing details button.
Enter the required information and choose your payment method: credit card, PayPal, Google Pay, or Apple Pay.
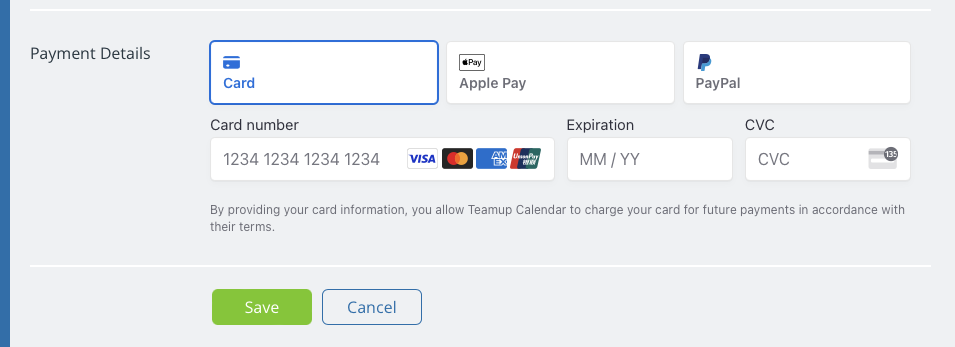
Note that Google Pay and Apple Pay will not appear as options for all users. If you do not see Apple Pay or Google Pay as an option, make sure you are signed into the appropriate Apple or Google account and try using a different browser. A simple rule of thumb: go to Chrome to use Google Pay and go to Safari to use Apple pay.
Change payment method and details
- Open the calendar in a browser.
- Go to the blue menu (top right).
- Select Settings.
- Select Subscription.
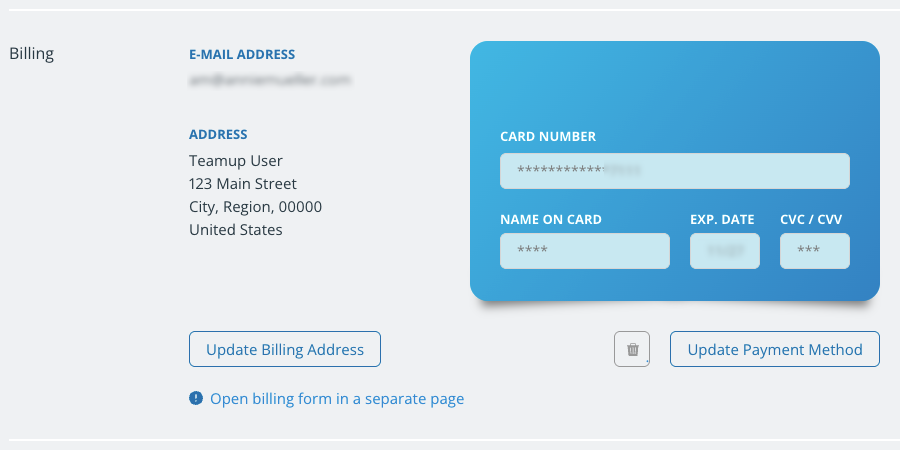
- Scroll to the Billing section:
- Click Update Billing Address to change your billing email or billing address.
- Click Update Credit Card/Update Payment Method to change your payment method.
- Enter new details, then Save.
Remove payment method
- Open the calendar in a browser.
- Go to the blue menu (top right).
- Select Settings.
- Select Subscription.
- Scroll to the Billing section.
- Click the trash can icon next to the Update Payment Method button.
- On the next screen, click Delete Payment Method to confirm.

Access billing history
- Open the calendar in a browser.
- Go to the blue menu (top right).
- Select Settings.
- Select Subscription.
- Scroll to the Invoices section. Every time you are billed, an invoice will be added to this section. The date and amount are listed beside each invoice:
- Click the blue PDF button to download an invoice as a PDF file.
